Overview
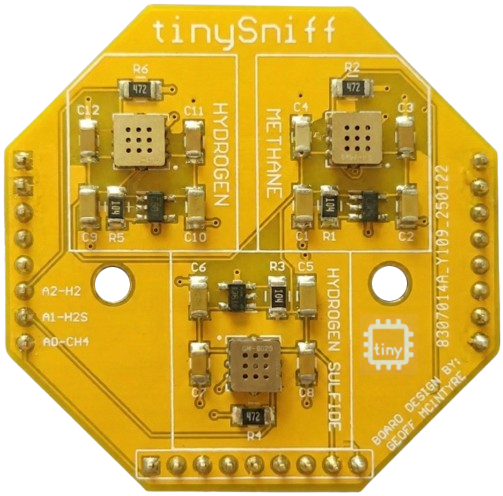
tinySniff is an expansion HAT for the tinyCore platform that gives your board a nose. It carries three gas sensors, a buzzer, and a button. That’s the whole board. Stack it on a tinyCore and you have a gas monitor with no breadboarding and no external wiring.
The three sensors are:
- H₂S, hydrogen sulfide (the rotten-egg one)
- CO, carbon monoxide
- CH₄, methane and other combustible gases
Plus a buzzer so it can yell at you, and a button so you can tell it to stop.
Okay, but first:
What the hell is a MEMS gas sensor?
Section titled “What the hell is a MEMS gas sensor?”These are MEMS sensors from Winsen. MEMS stands for Micro-Electro-Mechanical Systems, which is a fancy way of saying “there is a tiny machine etched into this chip.”
Inside each one is a thin film of metal-oxide material sitting on a little heater. That film has a resistance you can measure. When the target gas shows up, it reacts with the surface of the film and changes the film’s electrical properties, which changes its resistance.
That’s the whole trick. Gas goes up, resistance changes, voltage changes, and the ESP32’s ADC reads that voltage. Each sensor sits in a voltage divider on the board, so all your code has to do is analogRead() the pin. No library, no I2C, no init sequence. Three analog reads and you’re done.
What’s on the Board
Section titled “What’s on the Board”| Component | Part | Measures |
|---|---|---|
| Gas Sensor | GM-602B | Hydrogen sulfide (H₂S) |
| Gas Sensor | GM-702B | Carbon monoxide (CO) |
| Gas Sensor | GM-402B | Methane / combustible gas (CH₄) |
| Buzzer | Magnetic buzzer | Audible alerts |
| Button | Tactile switch | Active-low |
Pin assignments live on the Pinouts page. Full bill of materials is in the tinySniff GitHub repository.
What You’ll Need
Section titled “What You’ll Need”| Item | Required For |
|---|---|
| tinyCore ESP32-S3 | Everything |
| tinySniff HAT | Everything |
| USB-C cable | Programming and power |
| Soldering iron + solder | Initial header assembly |
| Micro SD card (FAT32) | SD Card Logger |
| WiFi network (2.4GHz) | Google Sheets, Text Notifications |
| Google account | Google Sheets |
| Email account with SMTP | Text Notifications |
1. Assembling the HAT
Section titled “1. Assembling the HAT”Once you get it out of the bag, you’ll have the tinySniff board and a set of headers. tinySniff connects to the tinyCore through those stacking headers, and they ship unsoldered, so this is your first job.
You get three headers: two 8-pin male headers, and one 9-pin female header. The two male headers go on the left and right edges. The female header goes along the bottom.
-
Insert the headers into the tinySniff HAT from the bottom side of the board, so the long pins point downward (these plug into the tinyCore) and the short pins poke through the top side where you’ll solder them.
Pay attention to orientation. It’s the same as tinySpeak if you’ve built one of those.
-
Before you solder anything, seat the long pins loosely into the tinyCore and set the tinySniff on top. You’re using the tinyCore as an alignment jig, which is the difference between headers that go in straight and headers that go in at 4 degrees and never quite seat right again.
-
Solder the short pins on the top side of the tinySniff. Tack one pin at each corner first to lock everything in place, then go back and do the rest.
-
Pull the tinySniff off, look over your joints, then re-seat it firmly. It should be snug but shouldn’t need force.
That’s it. That is everything you need to get started.
2. Install the Libraries
Section titled “2. Install the Libraries”Four of the five demos need no libraries at all.
The gas sensors are just analog voltages, so analogRead() handles them. The button is digitalRead(). And SD, FS, WiFi, HTTPClient, and Preferences all ship with the ESP32 Arduino core.
Only the alarm demo needs an outside library:
| Library | Used By | Author |
|---|---|---|
| ESP Mail Client | Text Notifications | Mobizt |
Install it through the Arduino IDE Library Manager (Sketch → Include Library → Manage Libraries…) or the Libraries tab in the left sidebar, and search for “ESP Mail Client.”
3. Reading the Numbers
Section titled “3. Reading the Numbers”The first thing to do with a new board is learn what your clean air looks like. Flash the Basic Demo, watch the graph for a few minutes, and write down roughly where each channel sits. That’s your reference point, and what every threshold in Text Notifications gets tuned against.
Give it a minute first. The sensing film only behaves predictably once its heater is at temperature. Readings in the first thirty seconds after power-up wander a long way.
Then give it a day, if you’re serious. For repeatable readings, the kind where Tuesday’s trace lines up with Thursday’s, leave the board powered for 24 to 48 hours first. This is burn-in, normal for every metal-oxide sensor ever made. The film’s surface chemistry settles down and stops drifting.
Troubleshooting
Section titled “Troubleshooting”All three channels read nearly the same value. That’s usually correct on a fresh board. In clean air these sensors sit near their resting resistance, so the three channels start out close together and only separate when something shows up. Try breathing on the board, or waving an alcohol wipe near it, and watch them split apart.
Readings drift steadily for the first few minutes. That’s the heater still coming up to temperature, or the film still settling. Wait it out.
A channel pegs near 4095 and stays there. You’ve saturated it. Get the board into fresh air and give it several minutes to recover. These sensors clear slowly. That’s the chemistry, not a fault.
Nothing responds at all. Check that the headers are fully seated on the tinyCore, and that you soldered all the pins, not just the corners you tacked. A cold joint on a sensor pin reads as a flat line.
The button does nothing. The button is on the RX pin and is active-low with the internal pull-up (pinMode(PIN_BUTTON, INPUT_PULLUP)). RX is also the UART receive line, so avoid holding the button down while you’re uploading firmware.
“SD mount failed.” The card needs to be FAT32, and fully inserted. Cards over 32GB often need reformatting.
WiFi won’t connect. The ESP32 is 2.4GHz only. It cannot see your 5GHz network. Double-check the WIFI_SSID and WIFI_PASS defines at the top of the sketch.